Like all marketing professionals in the AEC industry, I’m always looking for innovative ways to showcase our models. Recently, I experimented with using augmented reality apps for displaying our models and the results blew me away. In the past year, this technology has matured in the amount of data augmented reality apps can handle. And best of all there are now free apps out there that allow you to experiment with the technology at no cost.
For those of you who are not familiar with the concept, augmented reality involves placing an additional layer of information on the existing world. For example, imagine holding up a tablet in a manufacturing facility and seeing data about upcoming maintenance task hovering over the equipment. I previously blogged on the topic and if you’d like to watch some videos and read about other applications check out my post Glorious Gadgets.
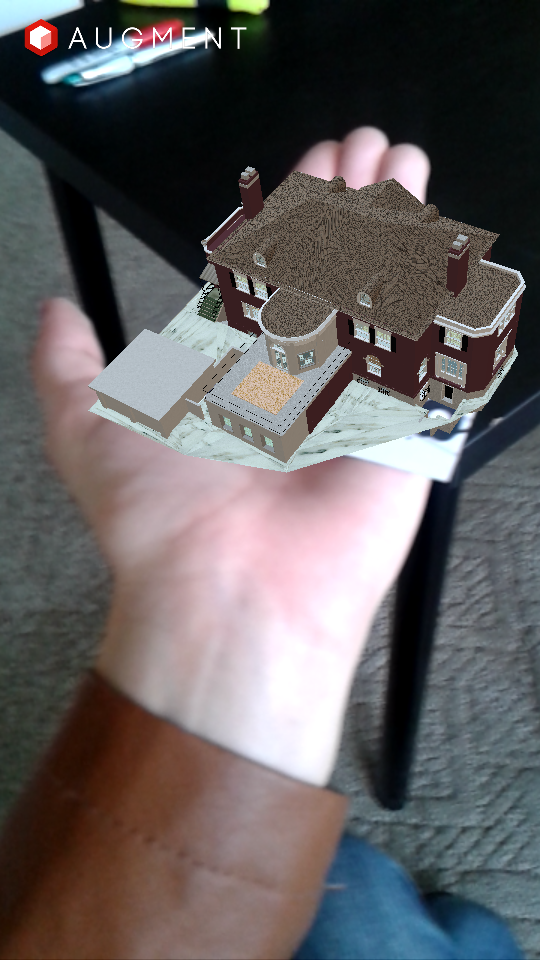
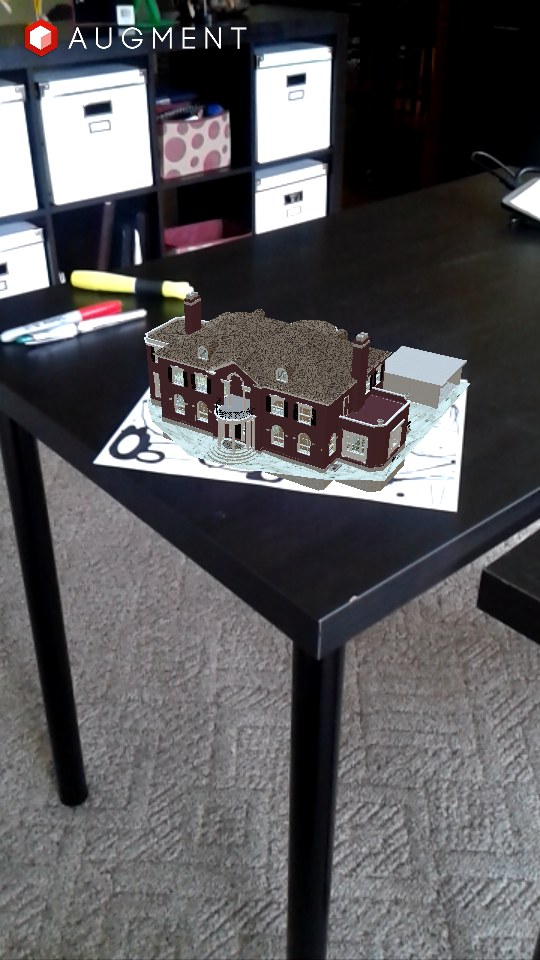
The applications of augmented reality for marketing and visualization are endless and endlessly exciting. I explored using an app called “Augment” (availible on Google Play at https://play.google.com/store/apps/details?id=com.ar.augment&hl=en) that allows you to place an existing 3D model in a physical location (for example on a table top) and then walk around, using your phone or tablet to view the model from all angles. If you are unfamiliar with this concept, the video below will give you a much quicker understanding of the idea than any description.
Basics of the Augment App
The get started, go to http://augmentedev.com/ and set up an account. The online interface is where you’ll be able to upload your 3D models and manage settings such as their scale. The interface is very straightforward and allows you to simply drag and drop zipped directories into the browser.
The more complicated part of the process is reducing your model size. Augment limits the number of polys per model to 1,000,000. However, during my experimentation with the app, I found that models that come close to this number either take a very long time to load or freeze the app up. As you pivot around the model the video streaming is very choppy and looks highly unprofessional – not something you want potential clients seeing. Un-textured models up to 750,000 load in a reasonable amount of time and provide seamless real time viewing. For textured models I would recommend 500,000 polys.
The process of uploading a model to Augment from Revit is as follows:
- For geometry only:
- Export from Revit as a DWG in a 3D view that captures all the geometry.
- In the “Export Setup”, ensure that under the “Solids” tab “ASIS Solids” is checked. This is NOT THE DEFAULT so you have to go in and change the settings every time you open Revit.
- Import the model into 3ds Max.
- Ensure the model has imported by the origin point. If this is not the case, move all of the geometry to the origin.
- Select all of the geometry.
- Export the file as an STL.
- Place the file in a zipped directory.
- Drag the directory into the Augment upload interface.
- For textured models:
- Export from Revit as an FBX.
- Open the file up in 3ds Max.
- Re-save the file in an OBJ format in the same directory as the automatically created FBX texture directory.
- Zip the directory with the OBJ, MTL and texture images.
- Drag the directory into the Augment upload interface.
After you have uploaded the model, there are a couple useful things that you can do in the online interface. First, under the “Dimensions” tab you can set the scale of the model. In all likelihood, if you are exporting from Revit, the model will need to be scaled down. Another useful setting is under the “Display” tab. I would go ahead and check “Disable drop shadows” for all models. The shadows in this app significantly increase loading time and real time streaming speed. And frankly they are not impressive enough to legitimize the decrease in speed.
The Mobile App
 To view your models you need to download the Augment app onto a mobile device such as a smartphone or a tablet. Once you have done so, you will be prompted to login to your account. After logging in, simply go to the “My Models” tab and you will be able to see the model you just uploaded.
After clicking on th model you may get the following error message: “Your device doesn’t have a compatible gyroscope.” This means you, like me, do not have a super fancy phone that is specially aware. In that case, go to the following link, download and print a tracker: http://augmentedev.com/images/A4_Tracker.pdf. This is essentially a QR code that your device recognizes and understands that it needs to display the model in its physical location.
Once you have downloaded the tracker, place your device directly over it. This makes it easiest for the Augment app to recognize the image. After a few seconds, your model will pop up. The time you have to wait varies based on the number of polys and textures in your model.
Once your model loads, you can either walk around it, or rotate the tracker. There are limitations, however. If you get too low, the software is not able to recognize the tracker at such an acute angle, and your model will disappear. Also if you get too close to the model, and a significant portion of the tracker is not in your camera range, the model will disappear. Not violating these limitations does get some getting used to. I actually found it much easier to manipulate the tracker, versus walking around the model. It feels slightly more natural and, I assume, because the camera does not have to reload the surrounding environment as much, the re-gen speed is faster.
There are a number of useful settings in the app interface that you can edit while viewing the model.
- Share: This feature allows you to share your model with other individuals who have the augment app. This is great for quickly getting something out to current or future clients.
- Settings: The settings tab allows you to manipulate a variety of things about your model. You can reposition the location of your model, causing it to hover above, below, to the left to the left or to the right of the center of the tracker. Furthermore if your model was not moved to the origin point in 3ds Max, you can make that correction here. You can also manipulate the scale of the model. Sometimes you may want the model to be bigger to be able to zoom in on detail and sometimes you may want a smaller scale to show the overall idea. The settings tab is also where you can turn off the shadows if you did not do so in the online interface.
- Rotate: Allows you to rotate the model by 90 degrees with each click. Depending on your export settings, your model may come in at the wrong angle. I have found that it is significantly less problematic to rotate the model within the app, than it is to rotate it in the modeling software. This feature can also be useful if you want to avoid some of the angle issues that occur when you get too low with the tracker.
- On screen camera: The on screen camera allows you to take picture you the model like the ones to the right. The in-app resolution of the camera isn’t amazing and is definitely something that can be improved. However it works to convey the overall concept.
Well there you have it! I highly recommend playing around with Augment. It’s straightforward, free and you won’t realize how impressive an augmented reality model is until you try it for yourself. If you would like any consultation on the process, feel free to comment or contact me.
Great article Margarita, I’ll be giving it a try at some point. Thanks Dave